Showing posts with label painting. Show all posts

Wednesday, January 1, 2014

Spray bottle art time - 2 year old activity

 I have been trying to do more art activities with my son since we have been staying indoors so much. I know he loves to get the water bottle and spray the cat or dogs; so I knew this would be a fun project for him. Although it would be best to do this outdoors, under controlled conditions it's possible to do indoors.

Materials:
I have washable kids paints which I mixed with water and placed in a spray bottle.
Paper to place on his art easel
Tape to hold the paper in place and the bottom of the paper to catch any running paint.
A rag, just in case the solution is too watery and you need to quickly clean up.

Image 1: Shows how I taped the paper to the bottom of the art easel. It catches the running paint. 


Image 2: My toddler having some fun with the spray bottles


Image 3: 
The paints and bottle I used.
You will know immediately if your solution is too watery when you spray the paper. Add more paint to intensify the color and decrease the liquidness of the solution.


Overall, a fun project for my toddler. Painting with spray bottles definetly adds to the excitement of art time.

Saturday, December 28, 2013

Art time at our house - 2 year old

At our house art time is a whole day process. I do it every month and will be trying to do it weekly now that the cold weather has set in.

How I set up..
First, we have so many coloring books we could open a store. I take old and un-used coloring books and tear the pages out.

Then, I tape all them all together and make one huge coloring page floor area.

Finally, I take out markers, paints, pens, crayons and color pencils.

He can now color to his hearts content !  
It keeps him very occupied and loves to use all of his art supplies. 

As an added bonus I give him stickers to embellish his artwork. 


Sunday, November 24, 2013

Rainy day art activity : painting with a sponge brush : age 2


Art time at our house. Age 2

I cut a small yellow sponge into strips and wrapped the strips around a paint brush with a rubber band. 

Easy project which definitely added some fun to regular painting. I used a paper plate as a paint pallet. My son enjoyed mixing the colors on the plate more than painting on paper. 

Great activity for a rainy day.

Sunday, October 6, 2013

Snazaroo face paints - Review

I've been getting ready for Halloween. So, I went ahead and purchased the : Snazaroo Face Painting Kit at Michaels.


Here is my shopping experience: 
1- Open up and check all the boxes ! Some we're missing colors!
2- Make sure the colors you need are included in the kit.
I'm doing a tiger face so I needed orange,yellow, black and white. 
3. Take your 40% coupon to Michael's, Hobby Lobby or Joanne Crafts. I spent 9.71 instead of $14.99+ tax.
4. Store the box horizontally not vertically! The paints will fall off easily. So, it's best to keep the box lying down :)

My son is almost 2 so I decided to start early in practicing his tiger face. Here are a few tips.

1.The sponge is too large to do such a small face. You will need to purchase a smaller sponge to be able to get more color details.
2. Barely moisten the sponge, too much water and the color is too diluted !
3. It comes with one brush, I would recomend more brushes if you need to do multiple colors. 
4. Working with a toddler is hard, you need to be quick and be prepared to correct mistakes when they move. Try to put a video on to keep them focused on something (I know, what a time not to have tv in the house, thank goodness for iPhones). 
5. Just keep q-tips or baby wipes handy to clean up mistakes.
6. Look on youtube or Pinterest for some great tutorials.


Overall, for the cost, this was a great purchase. My son loves to have me paint on him, he always asks for more. We ended up using them for a birthday party too. Really a great item to have at home with toddlers, especially on a rainy day when keeping them busy is a challenge.

Friday, August 30, 2013

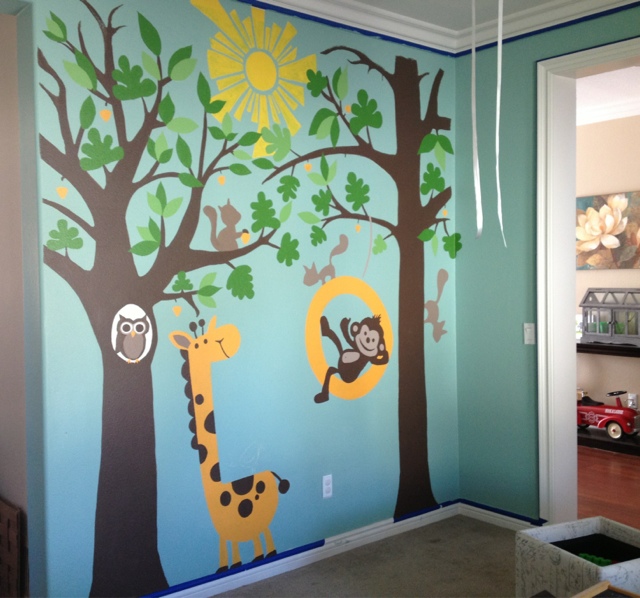
Playroom Mural...Is it almost done ?

It's been a while since I updated the work my husband has done on the mural. It seems every week we get a little closer to finishing it. There is still some tree and grass details that need to be added. We are contemplating adding a lion, unfortunately we need to start cleaning out the garage and the mural has taken us a couple of months already. Seems like this is how it's going to stay for a while, that garage isn't going to organize itself.

Monday, August 5, 2013

Playroom mural - half way finished !!

This past weekend my husband painted the edges of the wall and an adjoining wall. It makes the mural look amazing ! While we still have an elephant, monkey, birds,  bird nest and a lion. It's looking awesome :)

Wednesday, July 31, 2013

Play Room Mural ... Hooray !!

There is still a lot of work to do on our mural but so far so good :) We have spent $15 total in paint samples and paint brushes. More than anything you need time and commitment. There is still a giraffe, monkey, elephant, fox and birds to add. My husband has done an awesome job. I wish I could help but the paint smell still makes me sick. So hopefully in the next couple of weeks we can mark this project complete. 

Our next home project will be the garage, heaven help us, its chaos in there !

Sunday, July 28, 2013

Painting a wall mural (update)


My husband has been able to make some progress on the mural today. The details that need to be added take time, since the chalk outline is only an simple aid.Its easy in a way, kind of like a coloring book just in a larger scale.


Sunday, July 14, 2013

HOMEMADE PAINTS USING CORNSTARCH.....TODDLER ACTIVITY

I find that my toddler loves to get into mischief whenever possible. To avoid major chaos in the house, I decided to make homemade paints. I recently found this website, which had several different recipes to try.

http://www.kids-cooking-activities.com/finger-paint-recipes.html#paintrecipe

Making homemade paints was easier that I thought. Although they don't have the paint quality of store bought paints. When the paints touch the paper it looked like a water mess with tint rather than real paint. My son loved it, he loved sitting on the giant piece of paper and pouring paint everywhere! 
It was messy but an activity he enjoyed and I loved how easy it was to clean up. I just rinsed him off with the hose and put the paper in the recycle bin. One thing that did occur is that my son decided to taste the paint. After one taste he decided it wasn't that yummy and I was glad all the ingredients came from my kitchen.

This is the recipe I tried from the website, you should allow almost half and hour too cool completely.

Finger Paint Recipes

Basic Finger Paint 
3 Tablespoons sugar
1/2 Cup cornstarch
2 Cup water (cold)
Food coloring
Dish detergent (aids in clean up)
Mix sugar and cornstarch together in a saucepan. Add cold water and stir completely. Cook over low heat, stirring constantly about 5 minutes. Cool, then divide into 4 cups or bowls. Add food coloring and a drop of detergent to each bowl.

Read more: http://www.kids-cooking-activities.com/finger-paint-recipes.html#ixzz2Z5nc87Mb